In a major emergency, it can often take several days before help is able to arrive. With a few simple steps, you can ensure your household is self-sufficient for three days, in the event of a disaster or other serious event.
|
|
Meet as a household, identify where to meet if your home is unsafe, and identify an out-of-area emergency contact.
|
 |
|
|
Have 72 hours worth of supplies on hand.
|
 |
|
|
Know how to protect your home and where to seek additional information for disaster preparedness.
|
 |
Make a Household & Family Plan
Make a Plan
 After a major disaster, it is unlikely that emergency response services will be able to immediately respond to everyone’s needs, so it’s important to be prepared to take care of yourself and your family. Plan to be on your own for at least the first 72 hours.
The following steps will help you prepare for any emergency:
- Try to select someone that is far enough away to not be affected by the same emergency. Provide this person with the names and contact information of the people you want to keep informed of your situation. Instruct family members to call this person and tell them where they are. Long distance phone service is often restored sooner than local service.
- Duplicate important documents and keep copies off-site, either in a safety deposit box or with someone you trust. Documents may include: passport, drivers license, social security card, wills, deeds, financial statements, insurance information, marriage license and prescriptions.
- Inventory valuables, in writing and with photographs or video. Keep copies of this information off-site with your other important documents.
- Make a household/family plan. Involve all key people in planning.
- Make your home safe.
- Put together a disaster supply kit. Plan to have supplies for yourself and your family for at least 3 days following a disaster.
- When planning, consider the special needs of children, seniors or people with disabilities, family members that don’t speak English and pets.
Household/Family
Talk with your family about potential disasters and why it's necessary to prepare for them. Involve each member of your family in the planning process. By showing them simple steps that can increase their safety, you can help reduce their anxiety about emergencies.
- Make sure everyone knows where to find your disaster supply kit and Go-bags.
- Have a flashlight and a pair of shoes under everyone’s bed in case there is an earthquake during the night. Use a plastic bag tied to the leg of the bed to keep these items from moving during an earthquake.
- Plan where to meet after a disaster if your home becomes unsafe. Choose two places, one just outside your home and one outside your neighborhood in case you are told to evacuate. Be sure your gas tank is always at least half full.
- Determine the best escape routes from your home. Try to identify two escape routes.
- Make sure each member knows who your family’s out-of-state contact is and instruct them to call this person and tell him/her where they are.
- Locate the gas main and other utilities and make sure family members know when and how to turn them off.
- Practice your evacuation routes, Drop, Cover & Hold and Stop, Drop & Roll drills.
- Teach each member of your family how to use a fire extinguisher.
- Create emergency response cards for each of your family members.
- When planning, consider the special needs of children, seniors or people with disabilities, family members that don’t speak English and pets.
Go-Bag & First Aid
Make a Plan
After a major disaster the usual services we take for granted, such as running water, refrigeration, and telephones, may be unavailable. Experts recommend that you should be prepared to be self-sufficient for at least three days. Store your household disaster kit in an easily accessible location. Put contents in a large, watertight container (e.g. a large plastic garbage can with a lid and wheels) that you can move easily.
Your basic emergency kit should include:
- Water – one gallon per person per day
- Food– ready to eat or requiring minimal water
- Manual can opener and other cooking supplies
- Plates, utensils and other feeding supplies
- First Aid kit & instructions
- A copy of important documents & phone numbers
- Warm clothes and rain gear for each family member.
- Heavy work gloves
- Disposable camera
- Unscented liquid household bleach and an eyedropper for water purification
- Personal hygiene items including toilet paper, feminine supplies, hand sanitizer and soap
- Plastic sheeting, duct tape and utility knife for covering broken windows
- Tools such as a crowbar, hammer & nails, staple gun, adjustable wrench and bungee cords.
- Blanket or sleeping bag
- Large heavy duty plastic bags and a plastic bucket for waste and sanitation
- Any special-needs items for children, seniors or people with disabilities. Don’t forget water and supplies for your pets.
First Aid
In any emergency, you or a family member may be cut, burned or suffer other injuries. Keep the following basic first aid supplies so you are prepared to help when someone is hurt.
Your Kit should include the following:
- Two pairs of disposable gloves
- Sterile dressings to stop bleeding
- Cleansing agent/soap and antibiotic towelettes to disinfect
- Antibiotic ointment to prevent infection
- Burn ointment
- Adhesive bandages in a variety of sizes
- Eye wash solution to flush the eyes or as general decontaminant
- Scissors
- Over-the-counter medicines such as Aspirin or other pain reliever, laxative, anti-diarrhea medication
- Prescription medications you take every day such as insulin, heart medicine, or asthma inhaler
- Prescribed medical supplies such as glucose monitoring equipment or blood pressure monitors
Food
When a disaster occurs, you might not have access to food, water and electricity for days, or even weeks. Store enough emergency food to provide for your family for at least 3 days.
- Store food items that are familiar, rather than buying special emergency food. Consider any dietary restrictions and preferences you may have.
- Ideal foods are: Shelf-stable (no refrigeration required), low in salt, and do not require cooking (e.g. canned fruit, vegetables, peanut butter, jam, low-salt crackers, cookies, cereals, nuts, dried fruit, canned soup or meats, juices and non-fat dry milk).
- Mark a rotation date on any food container that does not already have an expiration date on the package.
- Include baby food and formula or other diet items for infants or seniors.
- Store the food in airtight, pest-resistant containers in a cool, dark place.
- Most canned foods can safely be stored for at least 18 months. Low acid foods like meat products, fruits or vegetables will normally last at least 2 years. Use dry products, like boxed cereal, crackers, cookies, dried milk or dried fruit within six months.
- After a power outage, refrigerated food will stay cold longer if you keep the door closed. Food should generally be consumed within 4 hours. Food in the freezer will normally remain safe for 2 days.
Water
In a disaster, water supplies may be cut off or contaminated. Store enough water for everyone in your family to last for at least 3 days.
Store one gallon of water, per person, per day. This amount will be adequate for general drinking purposes. Three gallons per person per day will give you enough to cook and for limited personal hygiene. Do not forget to plan for your pets.
If you store tap water:
- Store water in food grade plastic containers, such as clean 2-liter soft drink bottles. Heavy duty, reusable plastic water containers are also available at sporting goods stores.
- Replace water at least once every six months.
If you buy commercially bottled “spring” or “drinking” water:
- Keep water in its original container, and don’t re-store a bottle once it’s been opened.
- Label bottles with their replacement date, and store in a cool, dark place.
- Replace water at least once each year.
Treating water after the disaster:
If you run out of stored drinking water, strain and treat water from your water heater or the toilet reservoir tank (except if you use toilet tank cleaners.) You cannot drink swimming pool or spa water, but you can use it for flushing toilets or washing.
Treatment process:
Begin by straining any large particles of dirt by pouring the water through a couple of layers of paper towels or clean cloth.
Next, purify the water one of two ways:
- Boil – bring to a rolling boil and maintain for 3-5 minutes. To improve the taste, pour it back and forth between two clean containers to add oxygen back.
- Disinfect – If the water is clear, add 8 drops of bleach per gallon. If it is cloudy, add 16. Shake or stir, then let stand 30 minutes. A slight chlorine taste and smell is normal.
Go-Bag
Your disaster kit is your Go-bag. Put the following items together in a backpack or another easy to carry container in case you must evacuate quickly. Prepare one Go-bag for each family member and make sure each has an I.D. tag. You may not be at home when an emergency strikes so keep some additional supplies in your car and at work, considering what you would need for your immediate safety.
- Flashlight
- Radio – battery operated
- Batteries
- Whistle
- Dust mask
- Pocket knife
- Emergency cash in small denominations and quarters for phone calls
- Sturdy shoes, a change of clothes, and a warm hat
- Local map
- Some water and food
- Permanent marker, paper and tape
- Photos of family members and pets for re-identification purposes
- List of emergency point-of -contact phone numbers
- List of allergies to any drug (especially antibiotics) or food
- Copy of health insurance and identification cards
- Extra prescription eye glasses, hearing aid or other vital personal items
- Prescription medications and first aid supplies
- Toothbrush and toothpaste
- Extra keys to your house and vehicle
- Any special-needs items for children, seniors or people with disabilities. Don’t forget to make a Go-bag for your pets.
Be Informed
Home Safety
During a disaster, ordinary objects in your home can cause injury or damage. However, there are simple steps you can take to make your home safer. Start by viewing each room with a “disaster eye” and identify potential hazards – bookshelves that could tip over in an earthquake and block exits or heavy objects that could fall and cause injury.
- Install smoke detectors on each level of your home and change batteries every 6 months.
- Move beds away from windows.
- Move mirrors and heavy pictures away from couches or places where people sit.
- Clear hallways and exits for easy evacuation.
- Store heavy items on the lowest shelves.
- Keep an ABC type fire extinguishers on each level and know how and when to use them.
- Strap down your water heater and fit all gas appliances with a flexible gas supply line.
- Store flammable or highly reactive chemicals (such as bleach, ammonia, paint thinners) securely and separate from each other.
- Secure pictures and wall hangings and use restraints to secure heavy items such as bookcases and file cabinets.
- Know how and when to switch off your utilities.
- Ensure that all window safety bars have emergency releases.
- Be sure your home number is visible from the street so emergency vehicles can find you.
Power and utilities
Natural Gas
Natural gas leaks can cause an explosive and flammable atmosphere inside a building. If you smell gas, hear gas escaping, see a broken gas line, or if you suspect leak, shut off the main valve and open all windows and doors.
- Never use candles or matches if you suspect a leak.
- Do not turn on electrical switches or appliances.
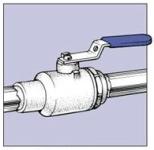
- Identify the main shutoff valve, which is located on the gas line coming into the main gas meter. (This is usually on the exterior of your home or building, or in an external closet.)
- Your main valve may look like this:
To turn gas off, give the valve a quarter turn in either direction. when the lever crosses the direction of the pipe (see below) the gas is off.
- Keep a crescent wrench or gas shut-off tool nearby to turn the lever.
- Once you turn off the gas, never attempt to turn it back on yourself. wait for your utility company to do it, but be aware that it may take several days for it to be turned back on.
Electricity
Electrocution can result from direct contact with live wires or anything that has been energized by these wires.
- Locate your home’s main electric switch, which is normally in the garage or outdoors, where the power lines enter the home. The panel box may have a flip switch or pull handle on a large circuit breaker.
- Shut off electricity when:
- Arcing or burning occurs in electrical devices.
- There is a fire or significant water leak.
- You smell burning insulation.
- The area around switches or plugs is blackened and/or hot to the touch.
- A complete power loss is accompanied by the smell of burning material.
- Contact Pacific Gas and Electric (PG&E) or phone (800) 743 -5000 if you have any questions.
Water
Water leaks can cause property damage and create an electrocution hazard.
- Shut off the water when there is a leak inside the building.
- The water shutoff is usually located in the basement, garage, or where the water line enters the home. The water shutoff is located on a riser pipe and is usually a red or yellow wheel. Turn wheel clockwise to shut off.
Your main water valve may look like this: